We’ve all been there, you need to print a document and for whatever reason, your printer is NOT cooperating. Here are some tips you should keep handy or perhaps memorize to keep your printer from being a jam master.
Prevent Printer Jams
- Use only paper that meets your printer’s specifications for this product.
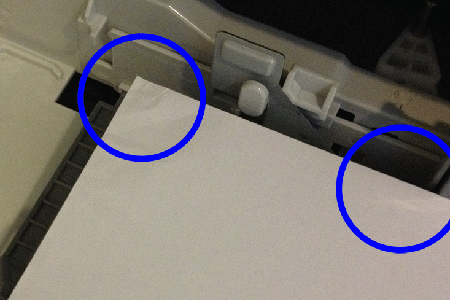
- Use paper that is not wrinkled, folded, or damaged. (shown in the image above)
- Use paper that has not previously been printed or copied on. (Raise your hand if you’re guilty.)
- Make sure the tray is not overfilled. If it is, remove the entire stack of paper from the tray, straighten the stack, and then return some of the paper to the tray.
- Make sure the paper guides in the tray are adjusted correctly for the size of paper. Adjust the guides so they are touching the paper stack without bending it.
- Make sure that the tray is fully inserted in the product.
- If you are printing on heavy, embossed, or perforated paper, use the manual feed feature and feed sheets one at a time.
- Get your printer cleaned annually to make sure there is no debris or waste in the printer, and that worn parts are replaced within factory specification.
If machine does not pick up paper
- Open the product and remove any jammed sheets of paper.
- Make sure the tray is loaded with the correct size of paper
- Make sure the paper guides in the tray are adjusted correctly for the size of paper. Adjust the guides to the appropriate indentation in the tray.
- Check the product control panel to see if the product is waiting for you to acknowledge a prompt to feed the paper manually. Load paper, and continue.
If machine is picking up multiple sheets of paper
- Remove the stack of paper from the tray and flex it, rotate it 180 degrees, and flip it over. Do not fan the paper. Return the stack of paper to the tray.
- Use only paper that meets factory specifications for this product.
- Use paper that is not wrinkled, folded, or damaged.
- Make sure the tray is not overfilled. If it is, remove the entire stack of paper from the tray, straighten the stack, and then return some of the paper to the tray.
- Make sure the paper guides in the tray are adjusted correctly for the size of paper. Adjust the guides so they are touching the paper stack without bending it.
Clearing paper jams from printer
Identify which of the four possible areas the printer is jammed
- Trays (manual, regular, and optional)
- Manual- remove slowly the jammed piece of paper
- Regular or optional paper trays- Slide paper tray out of machine. Remove any damaged paper from tray. If any is jammed in the feed area of the printer, slowly remove paper from machine. Make sure remaining paper is undamaged, flat, and below maximum height indicators.
- Top cover and under print cartridge- Open top cover. Remove toner cartridge. Remove paper by grasping both sides and slowly removing it.
- Fuser area (Be careful- Fuser may be extremely HOT!!)- Turn off product. Rotate product so that the rear is facing you. Disconnect power cord. Open the Rear output bin. Remove paper (some models may have a removeable fuser to help make paper jams in this area be removed easily). Close output bin, reconnect cord, and power on.
- Output bin – Turn off product. Open the rear output bin. Grasp paper by both sides and slowly pull paper out of the printer. Close the bin. Turn power on. If jam persists check other locations.
* For same day service, calls must be received by 10:00 am EST, your business must be within our service area, applies to service calls only.
*Find out more about the *75 pricing!
Service area includes the following counties: Fulton, Cherokee, Forsyth, Cobb, Bartow, Dekalb, Gwinnett, and Douglas counties. The cities we service include but are not limited to: Atlanta, Alpharetta, Acworth, Austell, Ball Ground, Buford, Cartersville, Canton, Chamblee, Cumberland, Decatur, Duluth, Dunwoody, Holly Springs, Johns Creek, Kennesaw, Lawrenceville, Marietta, Milton, Mountain Park, Norcross, Powder Springs, Roswell, Sandy Springs, Smyrna, Woodstock


Leave A Comment
You must be logged in to post a comment.